Welcome to your Shared Inbox hosted by Spike!
Spike’s Shared Inbox is part of our premium offering. It is more than just another email account—it’s your team’s secret weapon for collaboration.
With Spike’s Shared Inbox, multiple teammates work together to seamlessly answer and manage emails.
Who needs a Shared Inbox?
-
•
Customer support teams: Consistently provide rapid responses, solve issues collaboratively, and ensure unparalleled customer satisfaction.
-
•
Sales teams: Never miss a lead again. Work in perfect sync to nurture prospects and slam-dunk those deals faster than ever.
-
•
Recruiting teams: Streamline application reviews and leave both hiring managers and candidates amazed at your unified approach.
-
•
Shared-responsibility teams: Whether it’s projects, campaigns, or client accounts, Spike ensures seamless communication, keeping everyone in the loop and driving success forward.
Getting Started
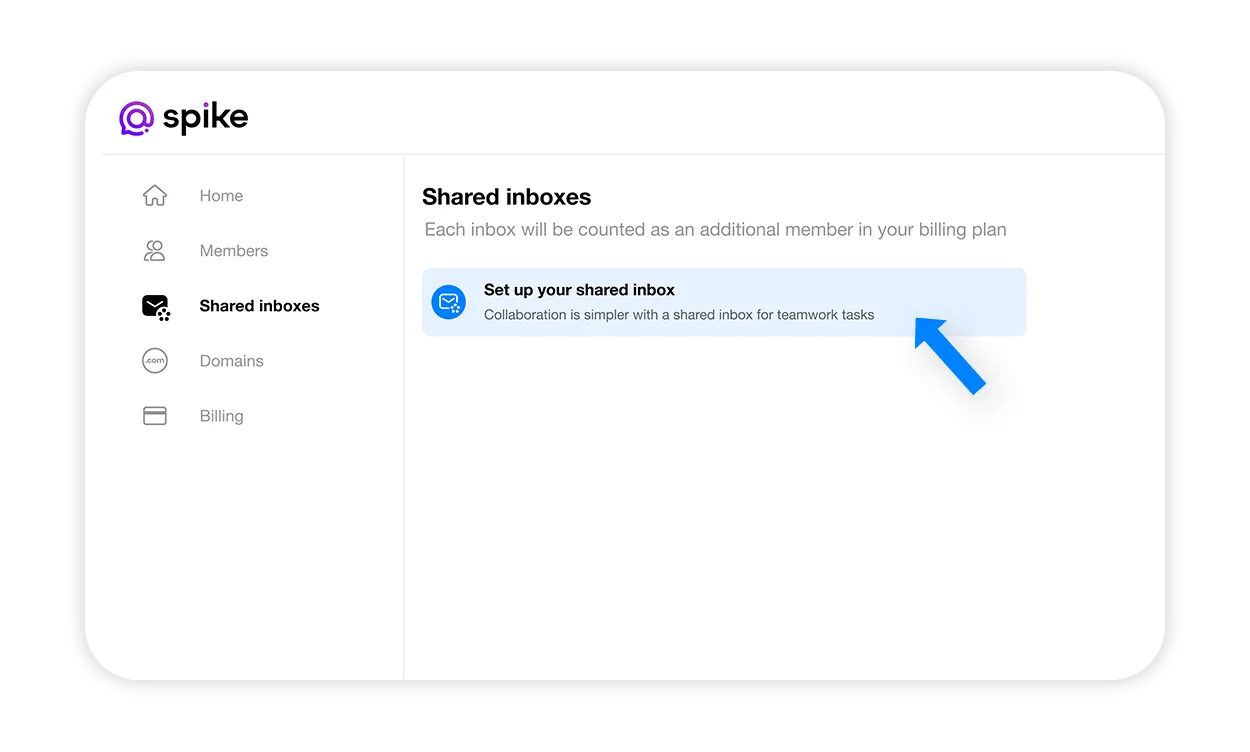
Teamspace admins and owners can get started creating and managing the Shared Inbox. Head to your Teamspace Admin panel, select the Shared Inboxes tab, and click “Set up your Shared Inbox.” Name your inbox, add relevant team members, and you’re ready to go!
Spike’s Shared Inbox is customizable to fit your team’s needs. Add as many Shared Inboxes as your business needs and adjust member access. It’s designed to supercharge your team’s communication and collaboration, making your workflow smoother than ever.
I’ve Just Been Invited to a Shared Inbox, What Now?
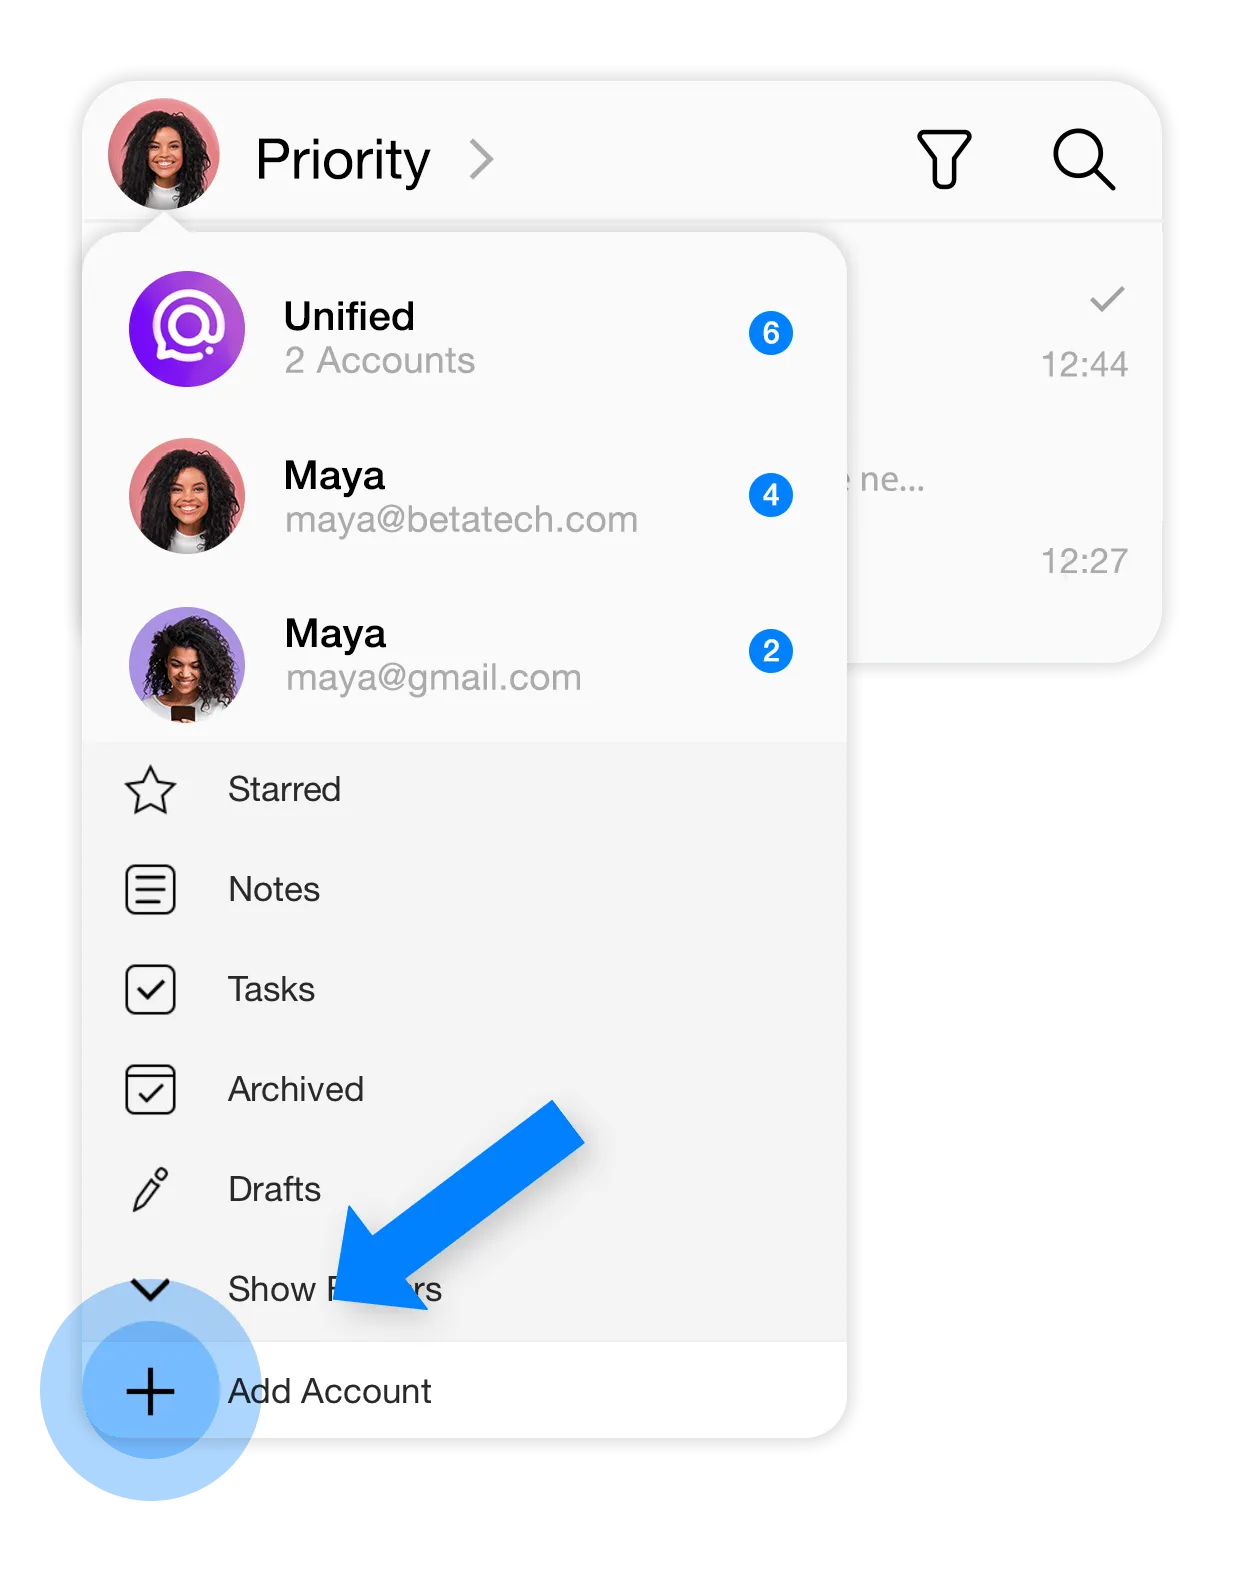
To connect to a Shared Inbox, make sure you are logged in to Spike with the relevant Teamspace account, go to Accounts and Settings, select Add Account, and enter the full email address of the Shared Inbox. That’s it! No need to use passwords to access the Shared Inbox. Members who are added to a Shared Inbox will also receive an email with instructions on how to log in.
Managing Your Shared Inbox
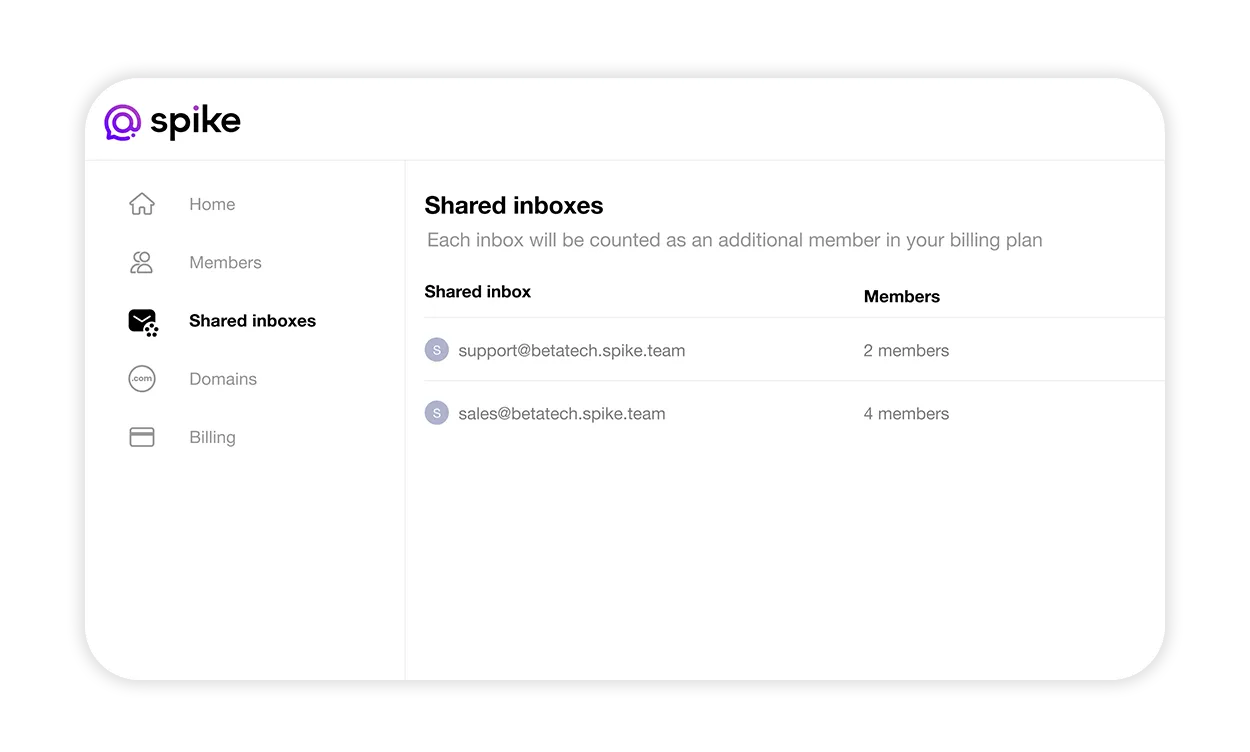
You’re not limited to just one Shared Inbox—feel free to create multiple inboxes, each serving its own purpose. This flexibility helps keep your team organized and boosts collaboration.
To manage your Shared Inboxes, head over to the Shared Inbox tab in your Teamspace Admin Panel and select “Shared Inboxes.” From there, you can easily manage and adjust your Shared Inboxes with a few clicks.
Adding Members to Your Shared Inbox
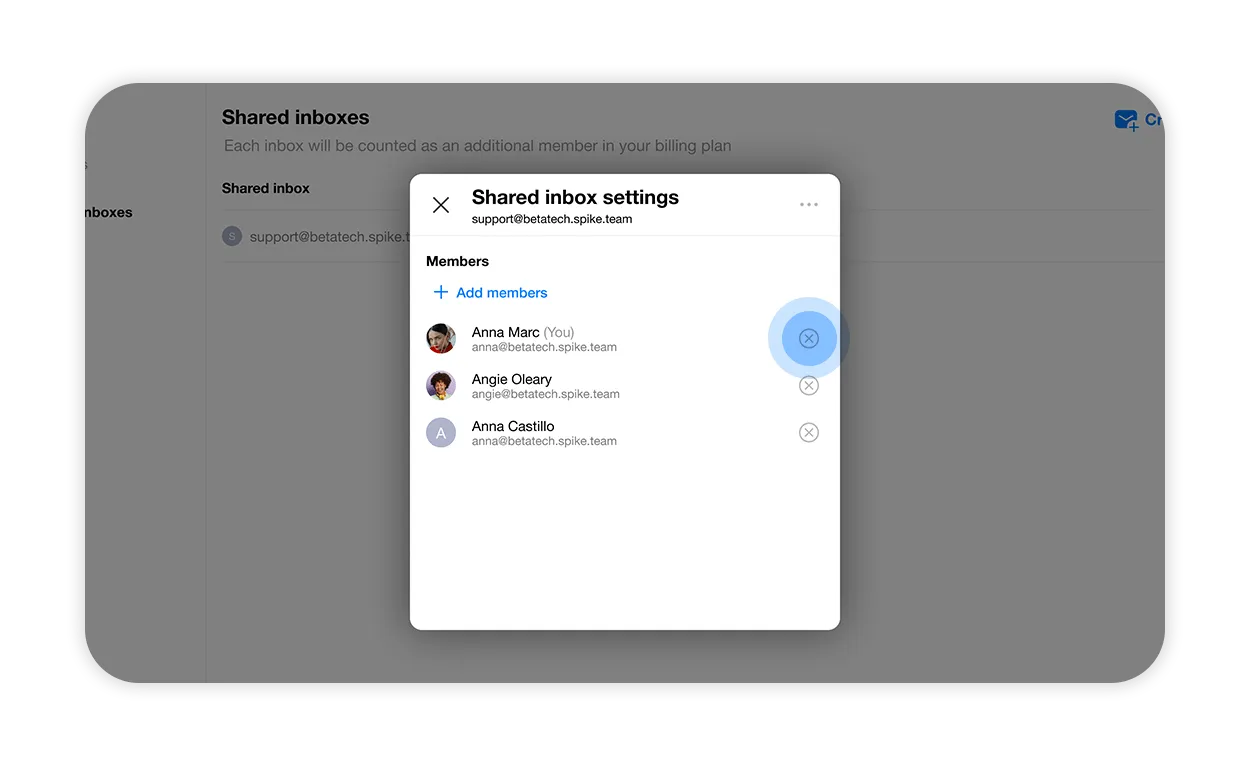
Teamspace admins and owners can manage member access to Shared Inboxes. To add a member, head to the Shared Inbox tab in the Teamspace Admin panel, choose the relevant Shared Inbox, and click the three dots on the right. Select the members you want to add and save. This gives you the flexibility to adjust access permissions as needed.

Remove a Member from a Shared Inbox
To remove a member, Teamspace admins and owners can go to the Shared Inbox tab in the Teamspace Admin panel, choose the relevant Shared Inbox, click the three dots next to the member’s name, and click the X. You won’t need to change passwords when removing a member. The removed member will be automatically signed out from the Shared Inbox account.
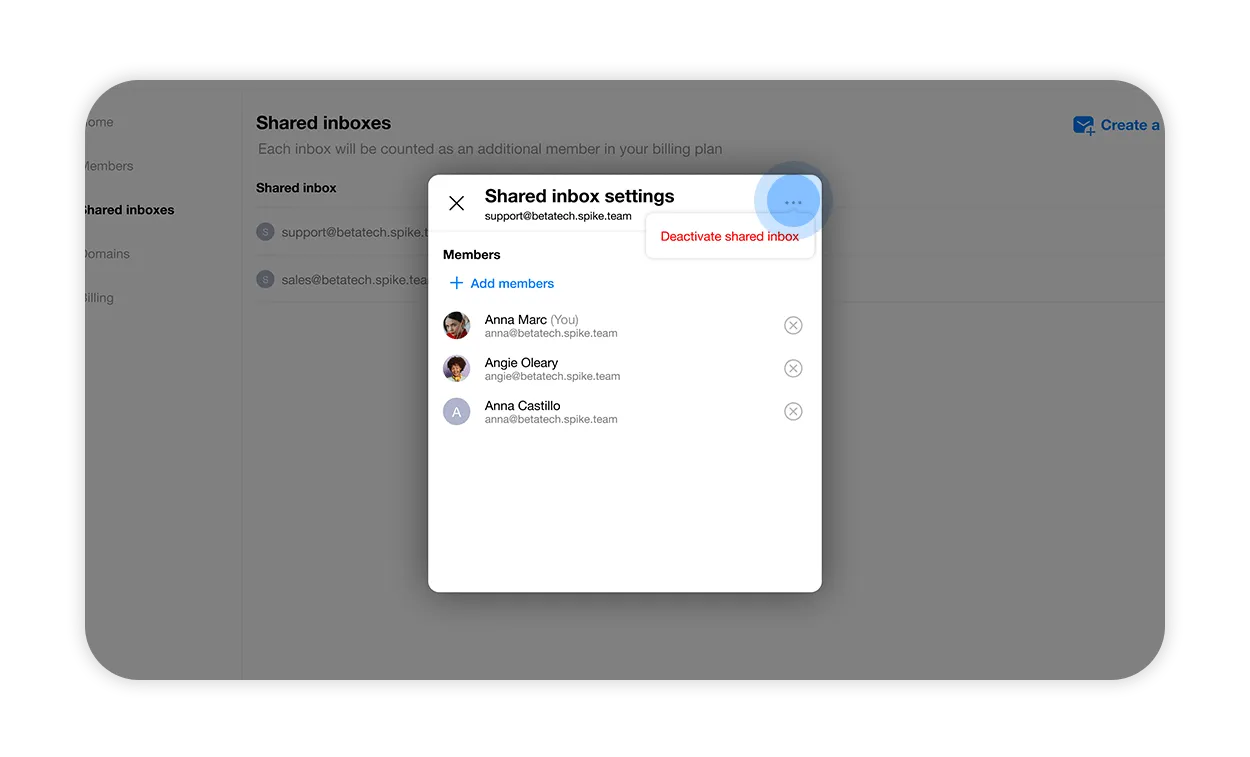
How to Deactivate a Shared Inbox
To deactivate a Shared Inbox, go to the Shared Inbox tab in your Teamspace Admin panel, click the three dots, and select “Deactivate Shared Inbox.” Confirm by selecting “Deactivate.” Connected members will no longer have access to the Shared Inbox, but you can reactivate it anytime. Members who are connected to the Shared Inbox before deactivation will not remain connected if you decide to reactivate it.
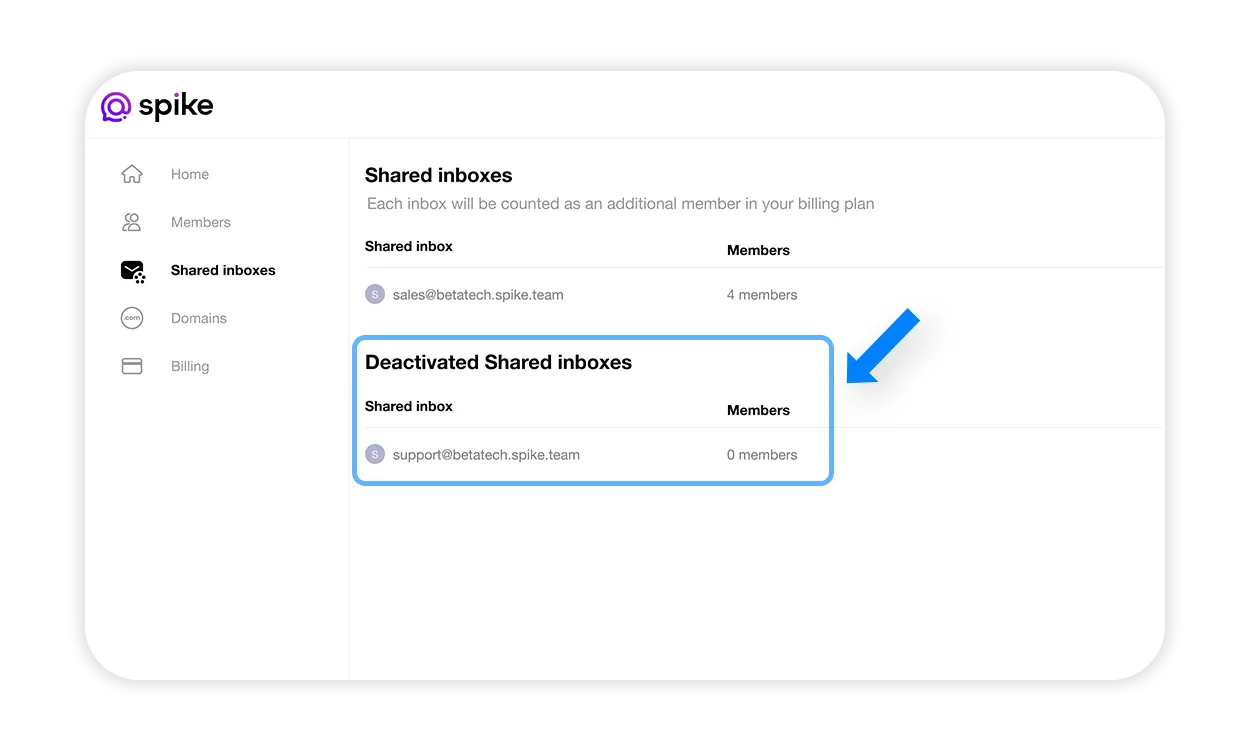
How to Reactivate a Shared Inbox
Deactivated Shared Inboxes appear at the bottom of the Shared Inbox tab in the Teamspace admin panel. Choose the relevant Shared Inbox, click on the three dots, and select “Activate Shared Inbox.” Add relevant members and click “Save.” Your Shared Inbox is now reactivated.
Billing
Each Shared Inbox counts as an additional seat in your billing.
Assigning Emails
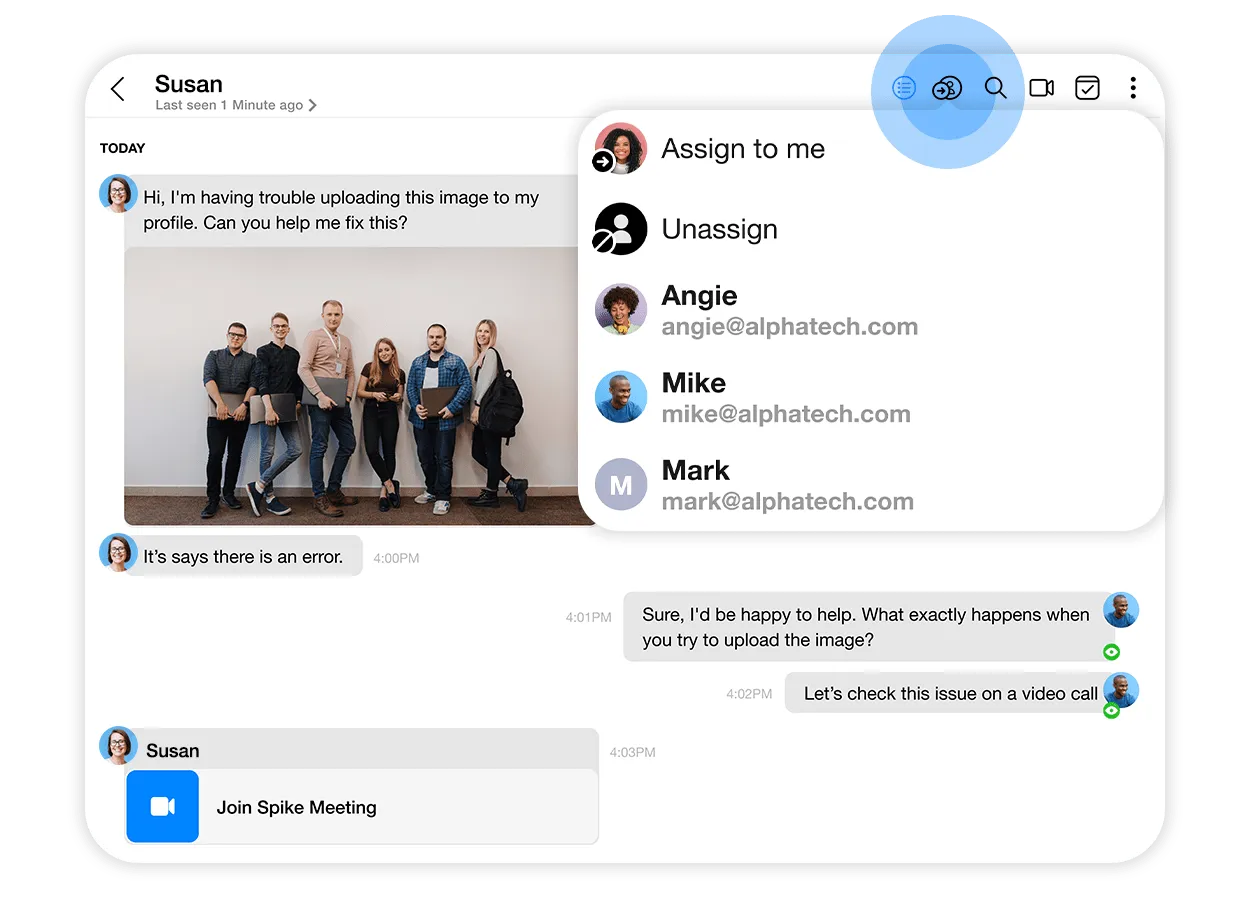
Take your Shared Inbox collaboration to the next level! By assigning emails, you can easily designate emails to the relevant members of your Shared Inbox.
This ensures clear ownership of tasks, making sure every email is addressed by the right person. To assign an email, simply open the email you want to assign and select the assignee from the dropdown menu on the upper right side of your screen in the thread.
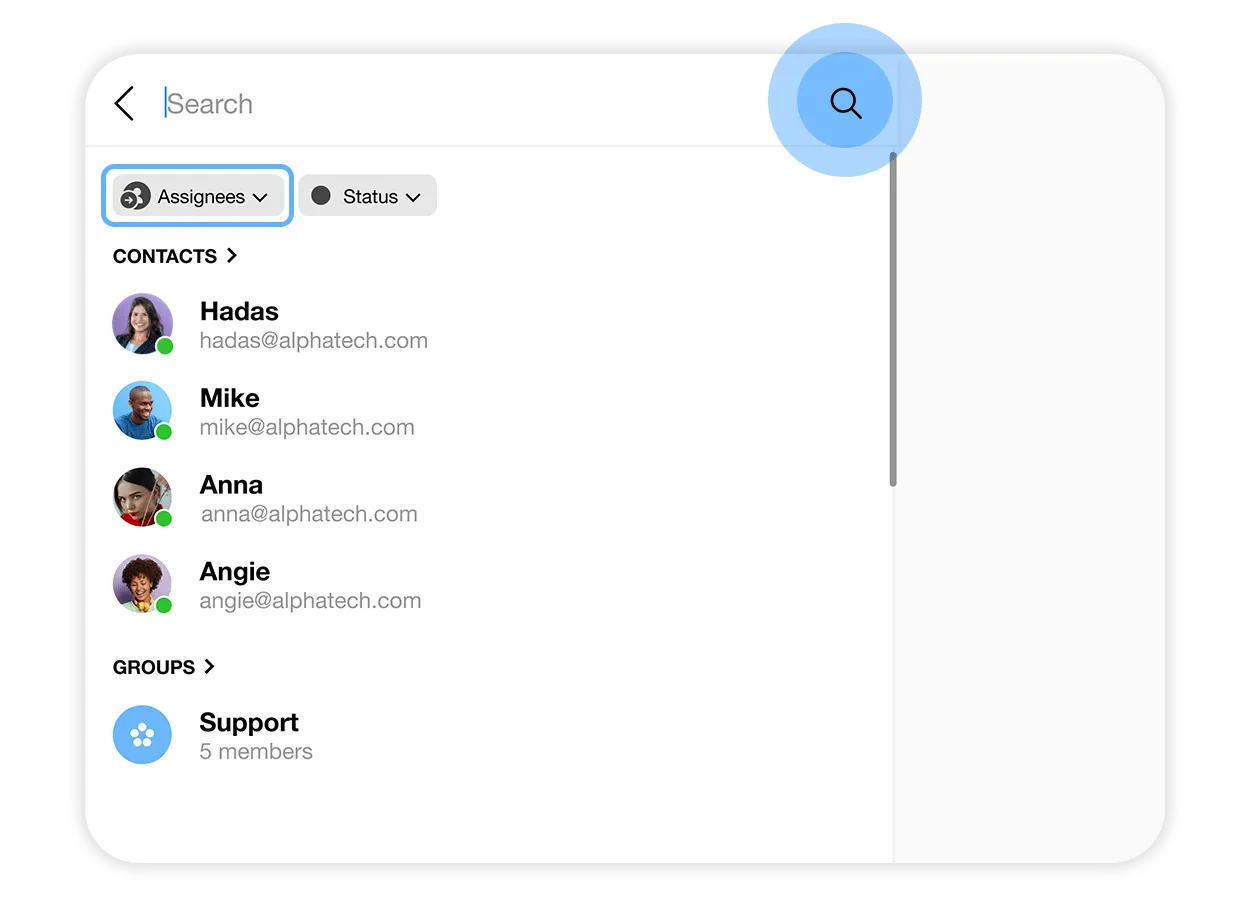
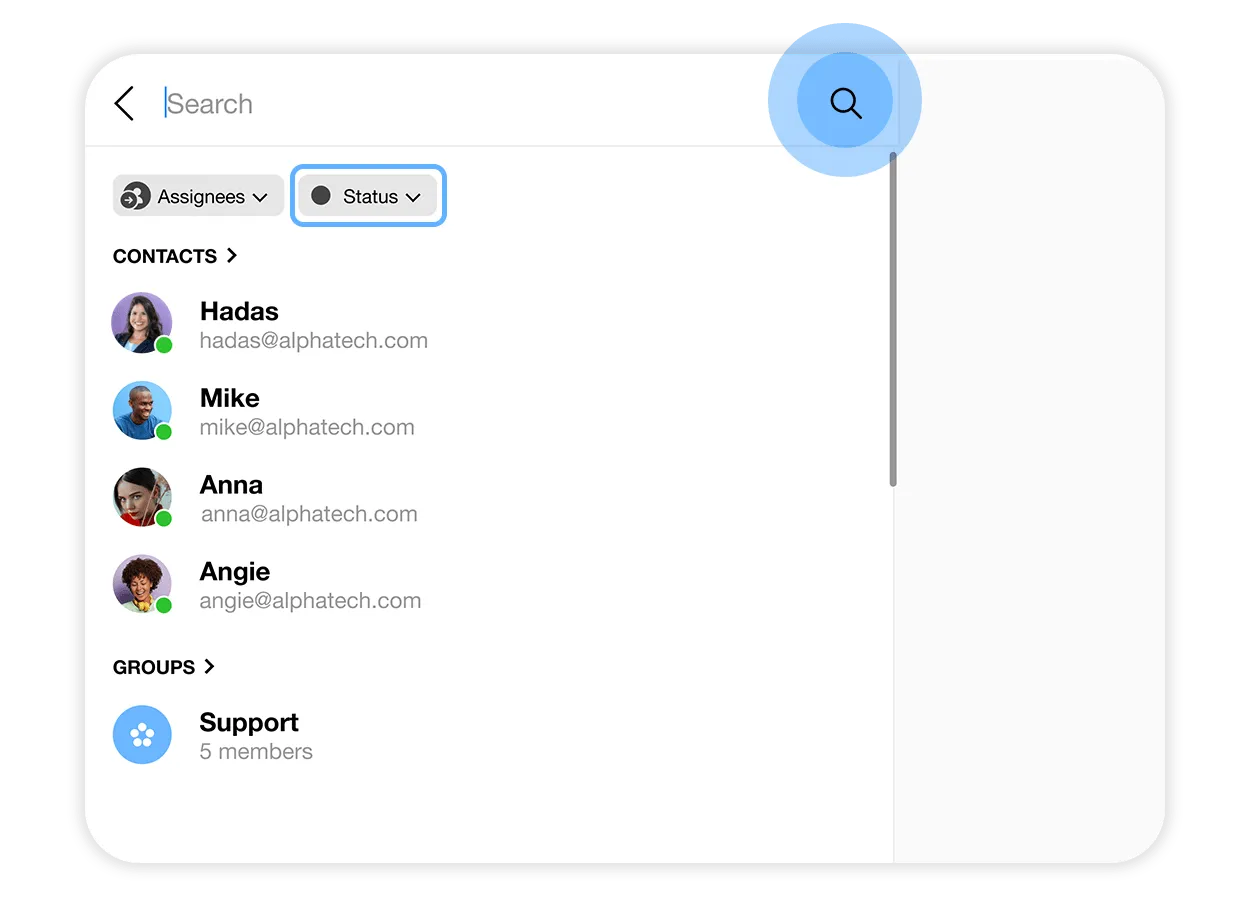
You can seamlessly filter your search for any email by assignee using the search function, allowing you to easily track who is responsible for each email. To complete a filtered search by assignee, go to the search icon, select “Assignees”, and choose which assignee you want to filter your search by!
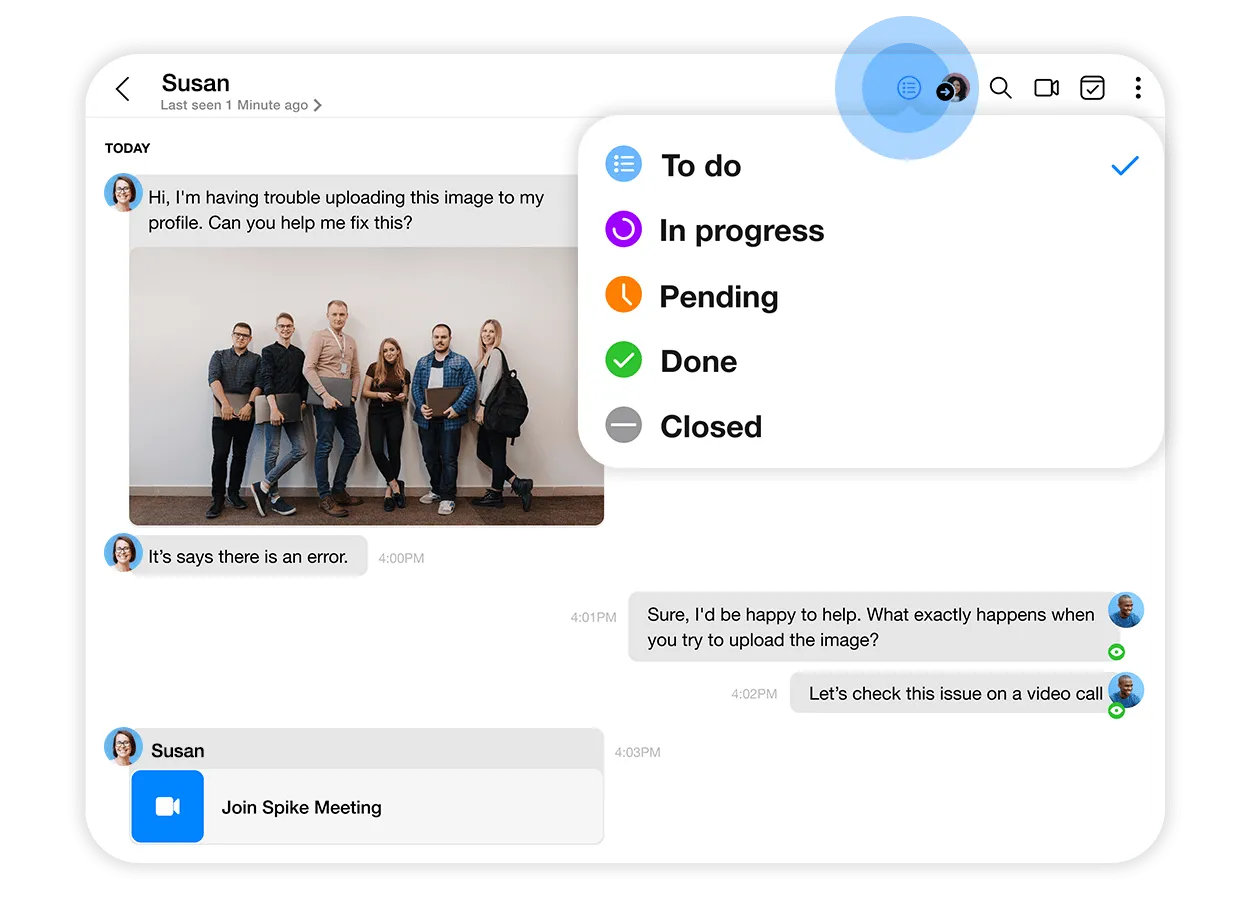
Add A Status
You can add status labels to any email in your Shared Inbox. You can set the status on an email in your Shared Inbox to “To Do,” “In Progress,” “Pending,” “Done,” or “Closed” helping you identify the current state of each email at a glance.
This helps in tracking the progress of email responses and managing your workflow efficiently.
To add a status to an email, open the email you want to update and select the appropriate status from the status dropdown menu on the top right side of your screen.
You can complete a filtered search by status, making it easy to find emails that need attention or follow-up. To complete a filtered search by email status, go to the search icon, select “Status”, and choose which status you want to filter your search by!
By utilizing the assignment and status features, you can ensure that your team stays organized and responsive.
In Conversation Comments and Notes
Boost team communication and collaboration in your Shared Inbox with In Conversation Comments and Notes, allowing team members to add context and insights directly to the relevant thread without cluttering your emails.
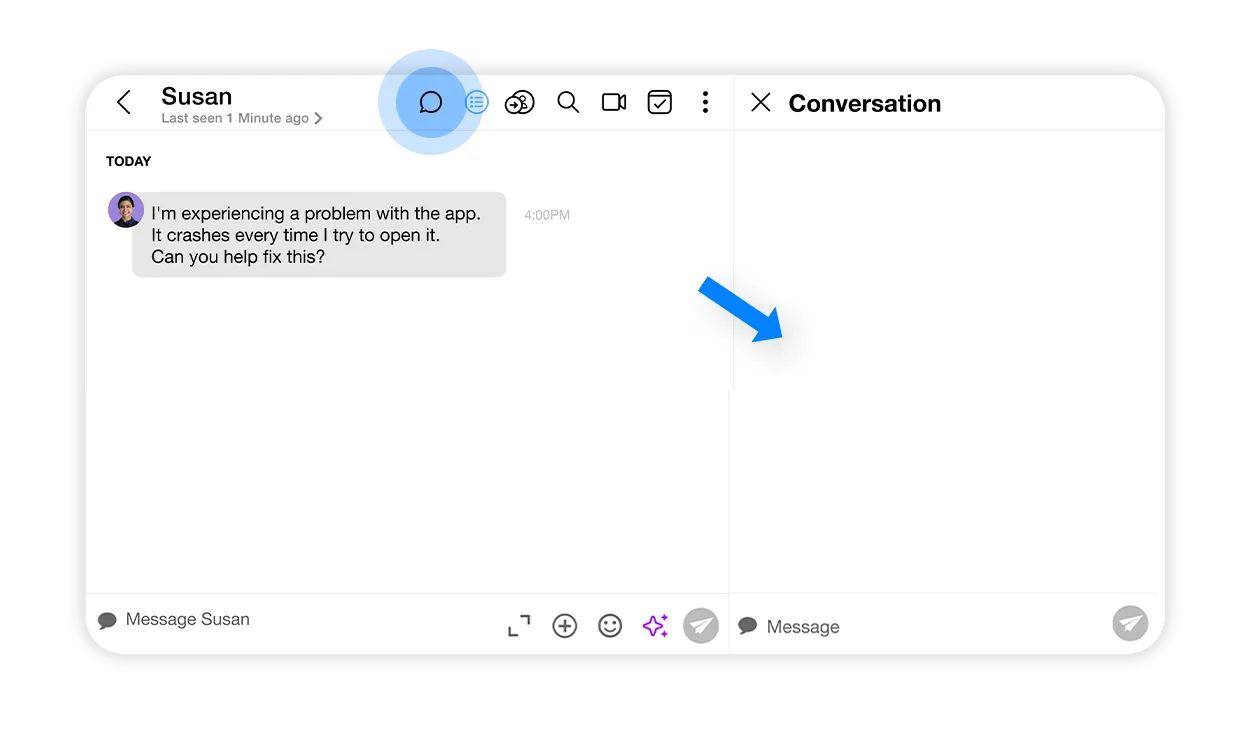
In Conversation Comments are text-only entries; perfect for adding specific remarks or questions related to the email content. Comments are great for tracking individual contributions and facilitating clear communication among the team.
To view or add a comment, simply navigate to the relevant thread in the Shared Inbox and click on the chat bubble icon to open the conversation and start commenting.
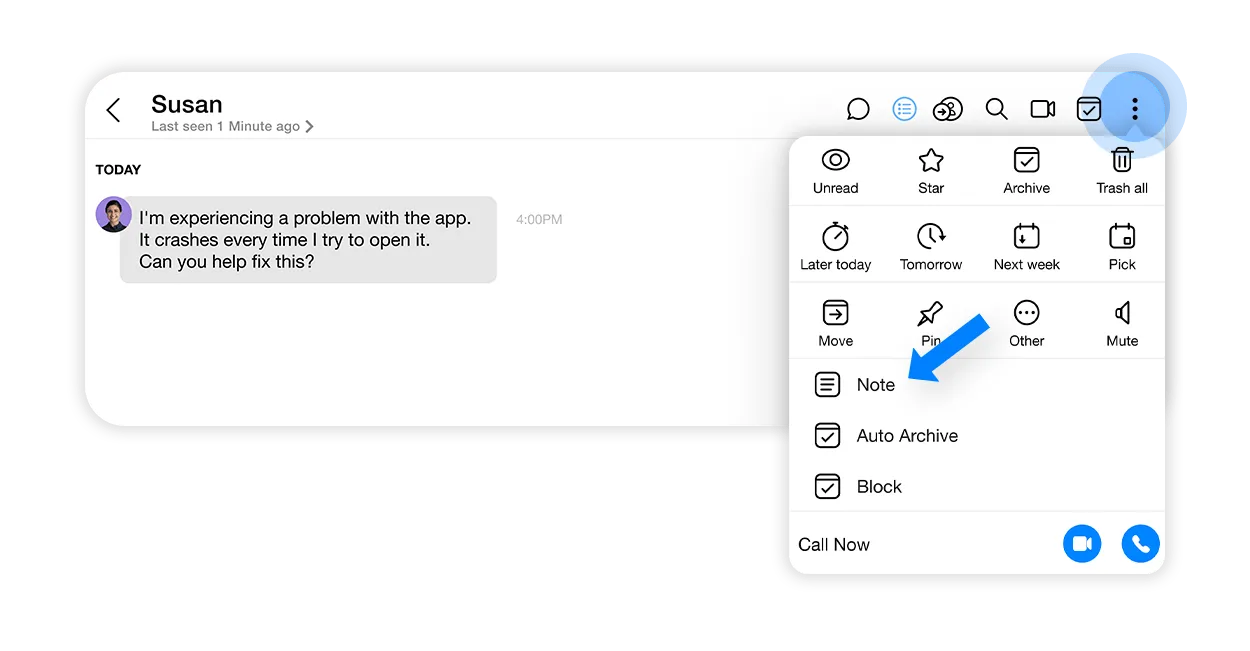
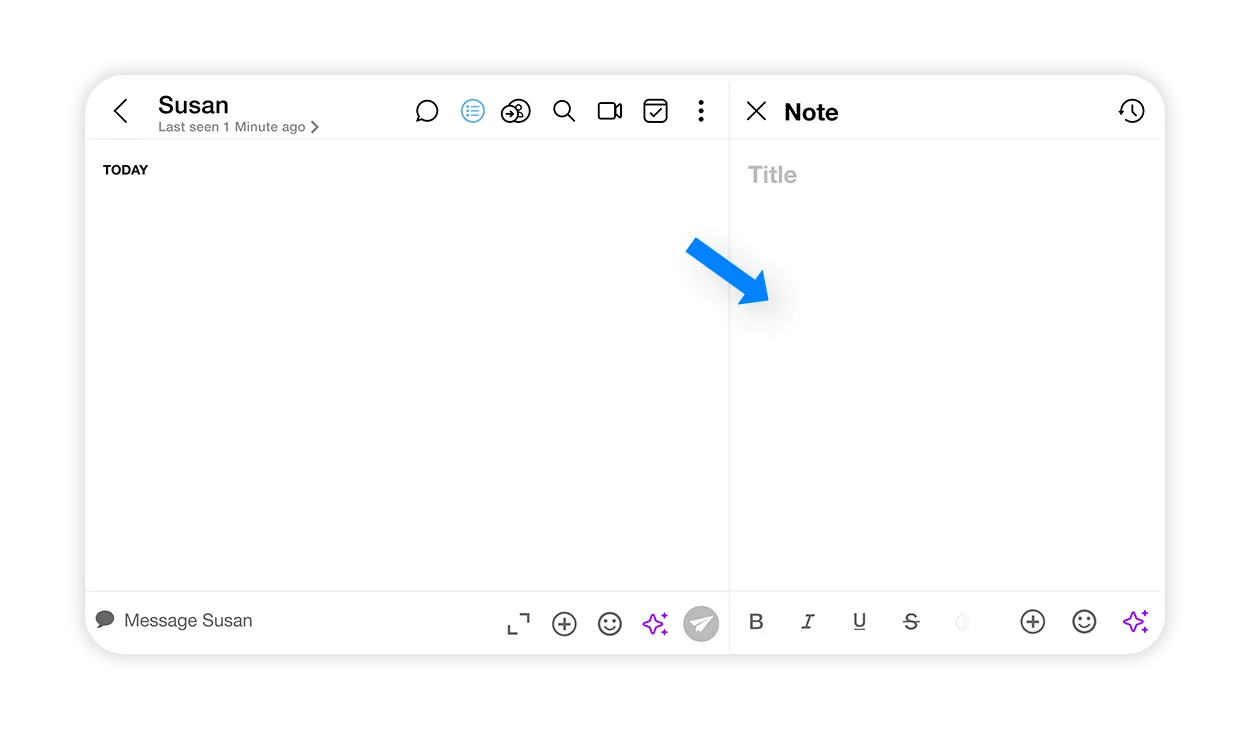
In Conversation Notes are designed to provide comprehensive information making them ideal for shared observations, documentation, or reference material. Notes can include text as well as media like pictures, tables, screenshots, and videos (e.g., call recordings).
To add or view a note, simply navigate to the relevant conversation in the Shared Inbox, click on the three dots in the top right corner, and select “Note.”
In Conversation Comments and Notes streamline internal communication and keep all relevant information in one easily accessible place.
These new features are accessible to your Shared Inbox team members and are not visible to external users, ensuring a secure and private collaboration environment.